This document guides you through the steps to publish information about your organization, its related process, and verification services and Quality Assurance Actions.
This guide is helpful if you have a small number of Quality Assurance Credentials and Quality Assurance Actions. If you have a large number of Quality Assurance Credentials or Actions, you can also add them to the Credential Registry via Bulk Upload. For more information on that publishing option, please refer to Entering Quality Assurance Credentials and Actions via Bulk Upload.
For more information on Quality Assurance Actions, please refer to Get Started: Understanding Quality Assurance Credentials and Actions.
For further instructions or questions, please contact the Credential Engine Partner Success team at publishing@credentialengine.org.
Enhance your Organization information to include processes and verification services
- Once your organization has been approved to publish, access the Credential Engine Publisher (https://apps.credentialengine.org/publisher). Log in using the same login credentials you created in the Accounts System.
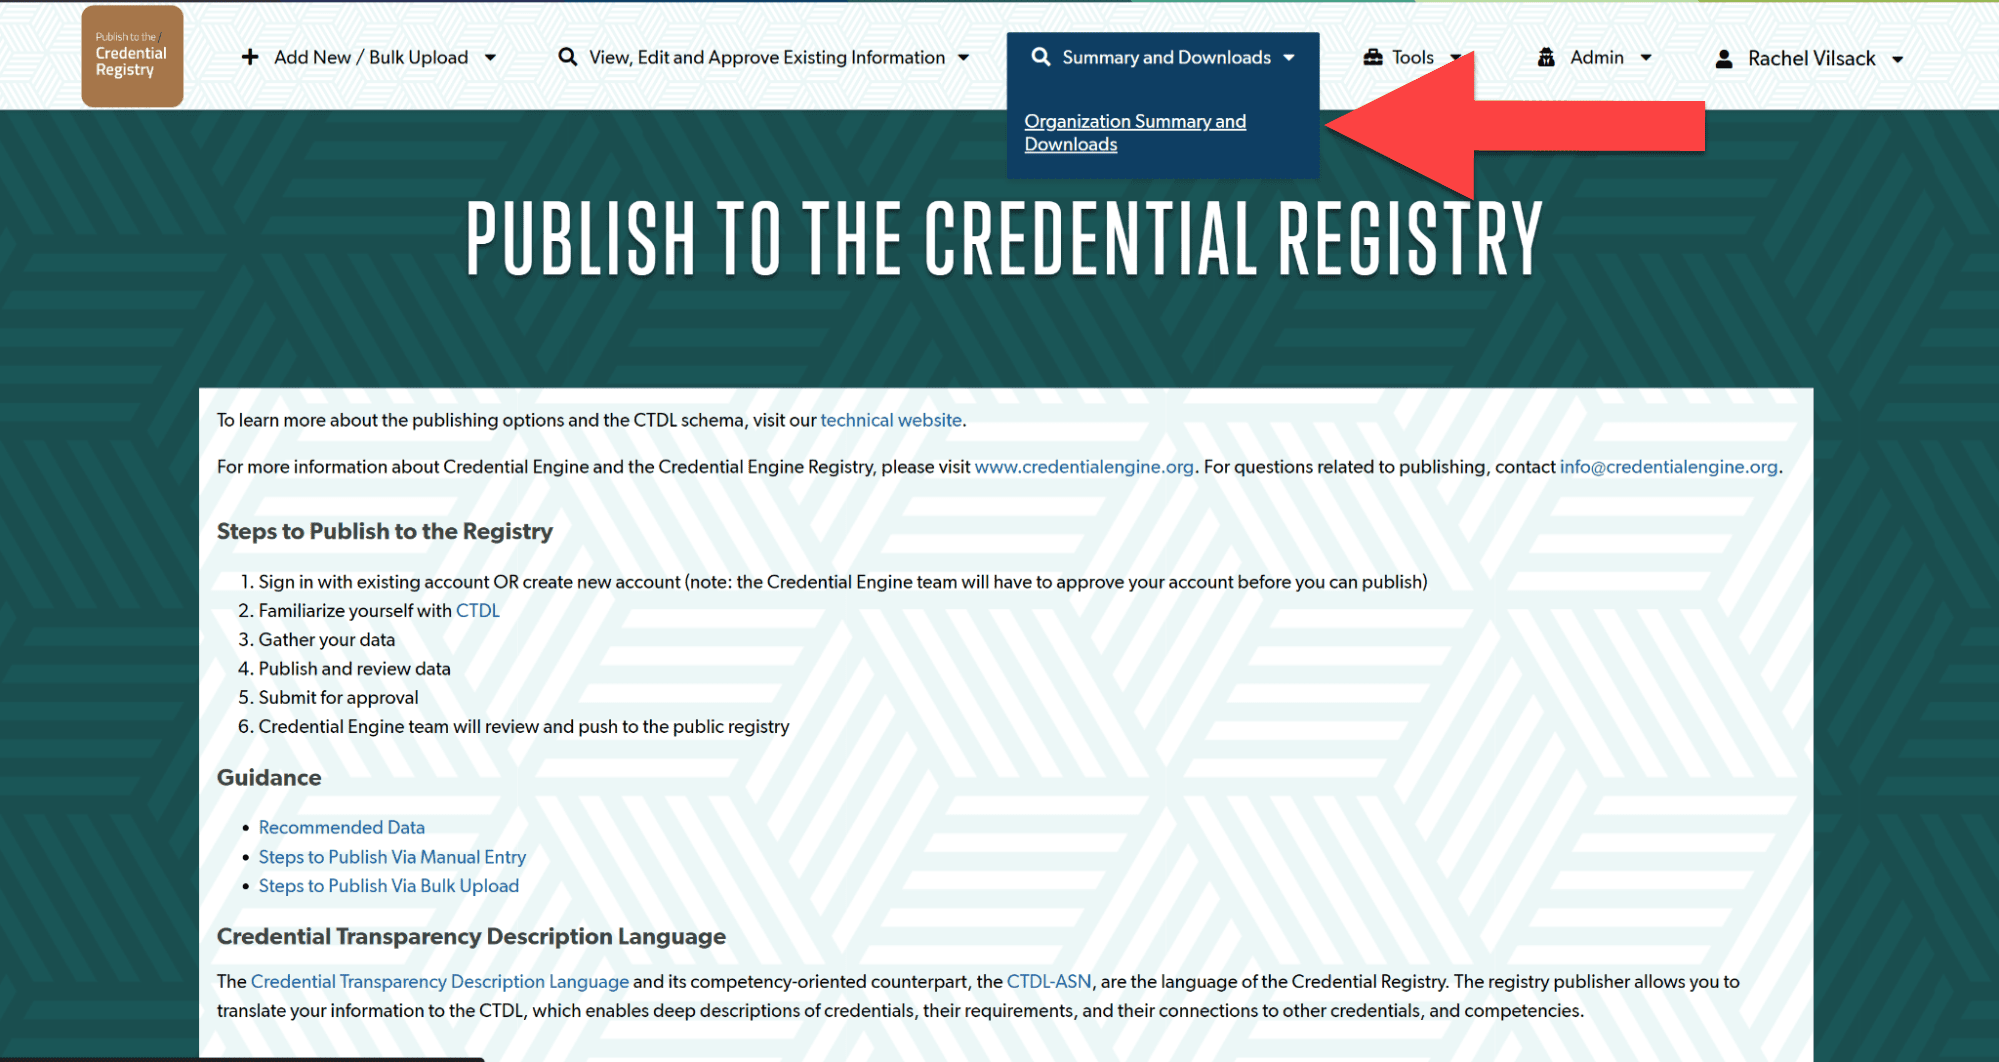
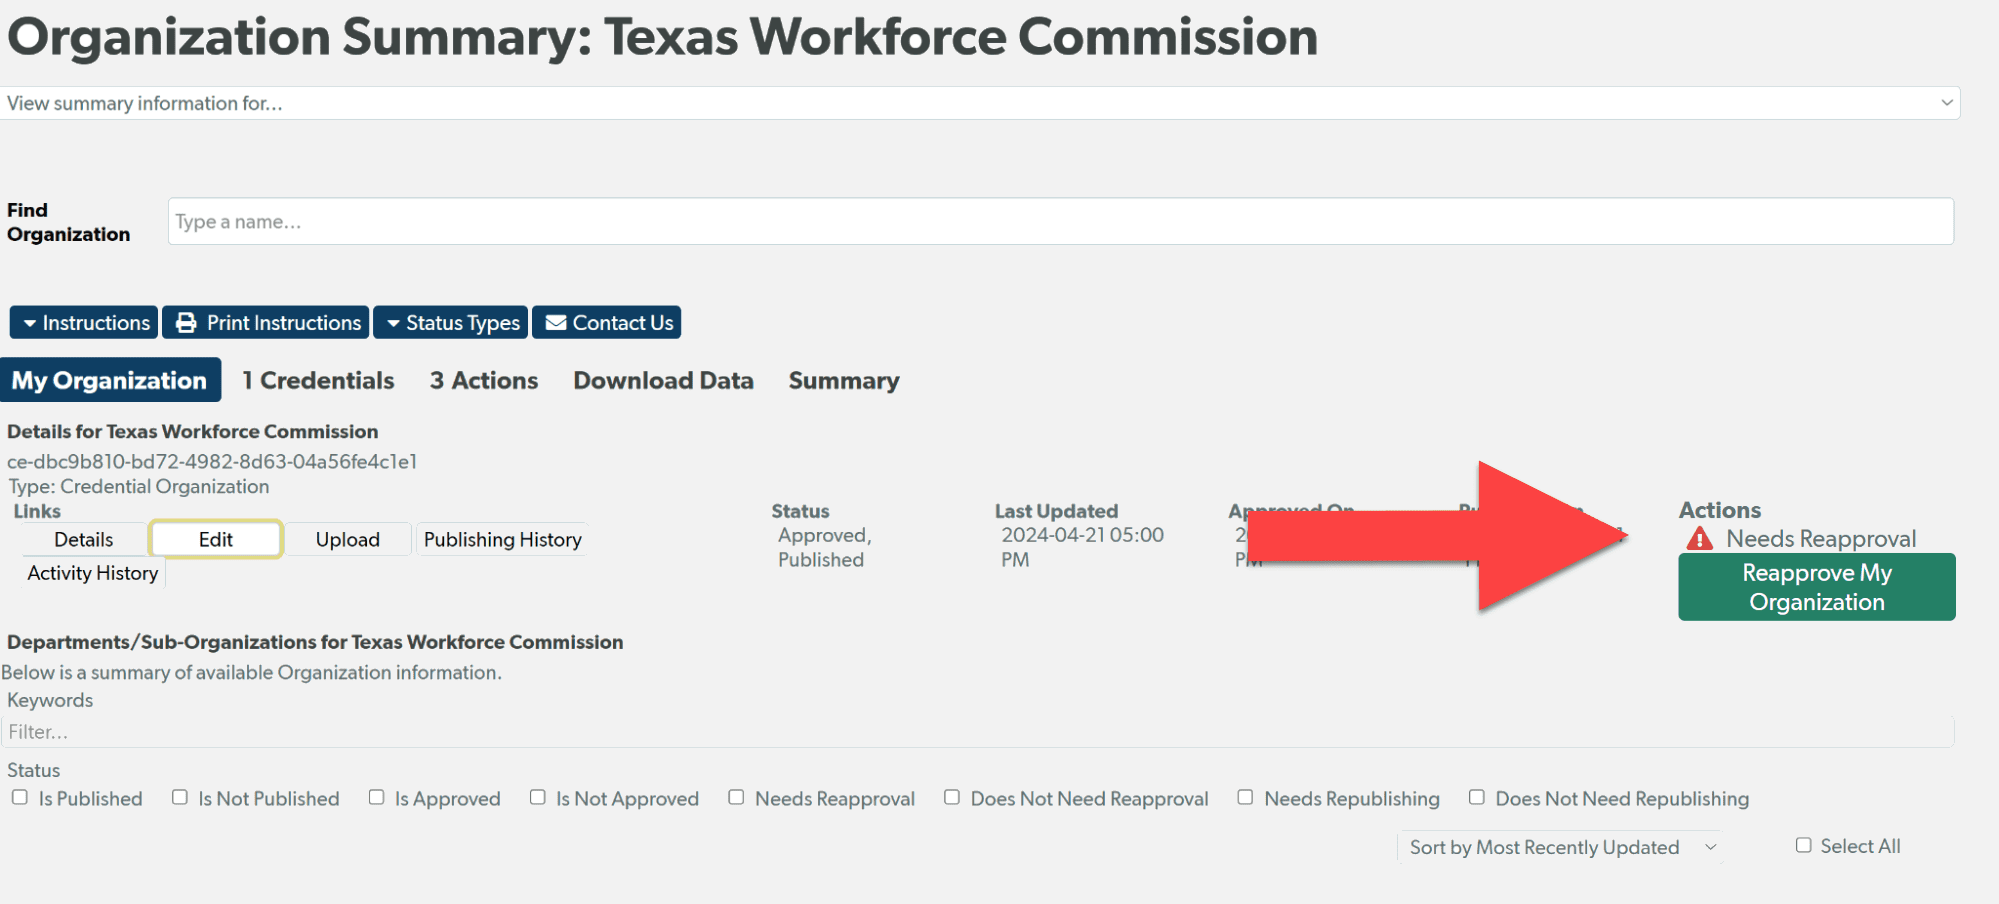
- Navigate to your Organization Summary by selecting the “Organization Summary and Download” options under the “Summary and Downloads” menu.

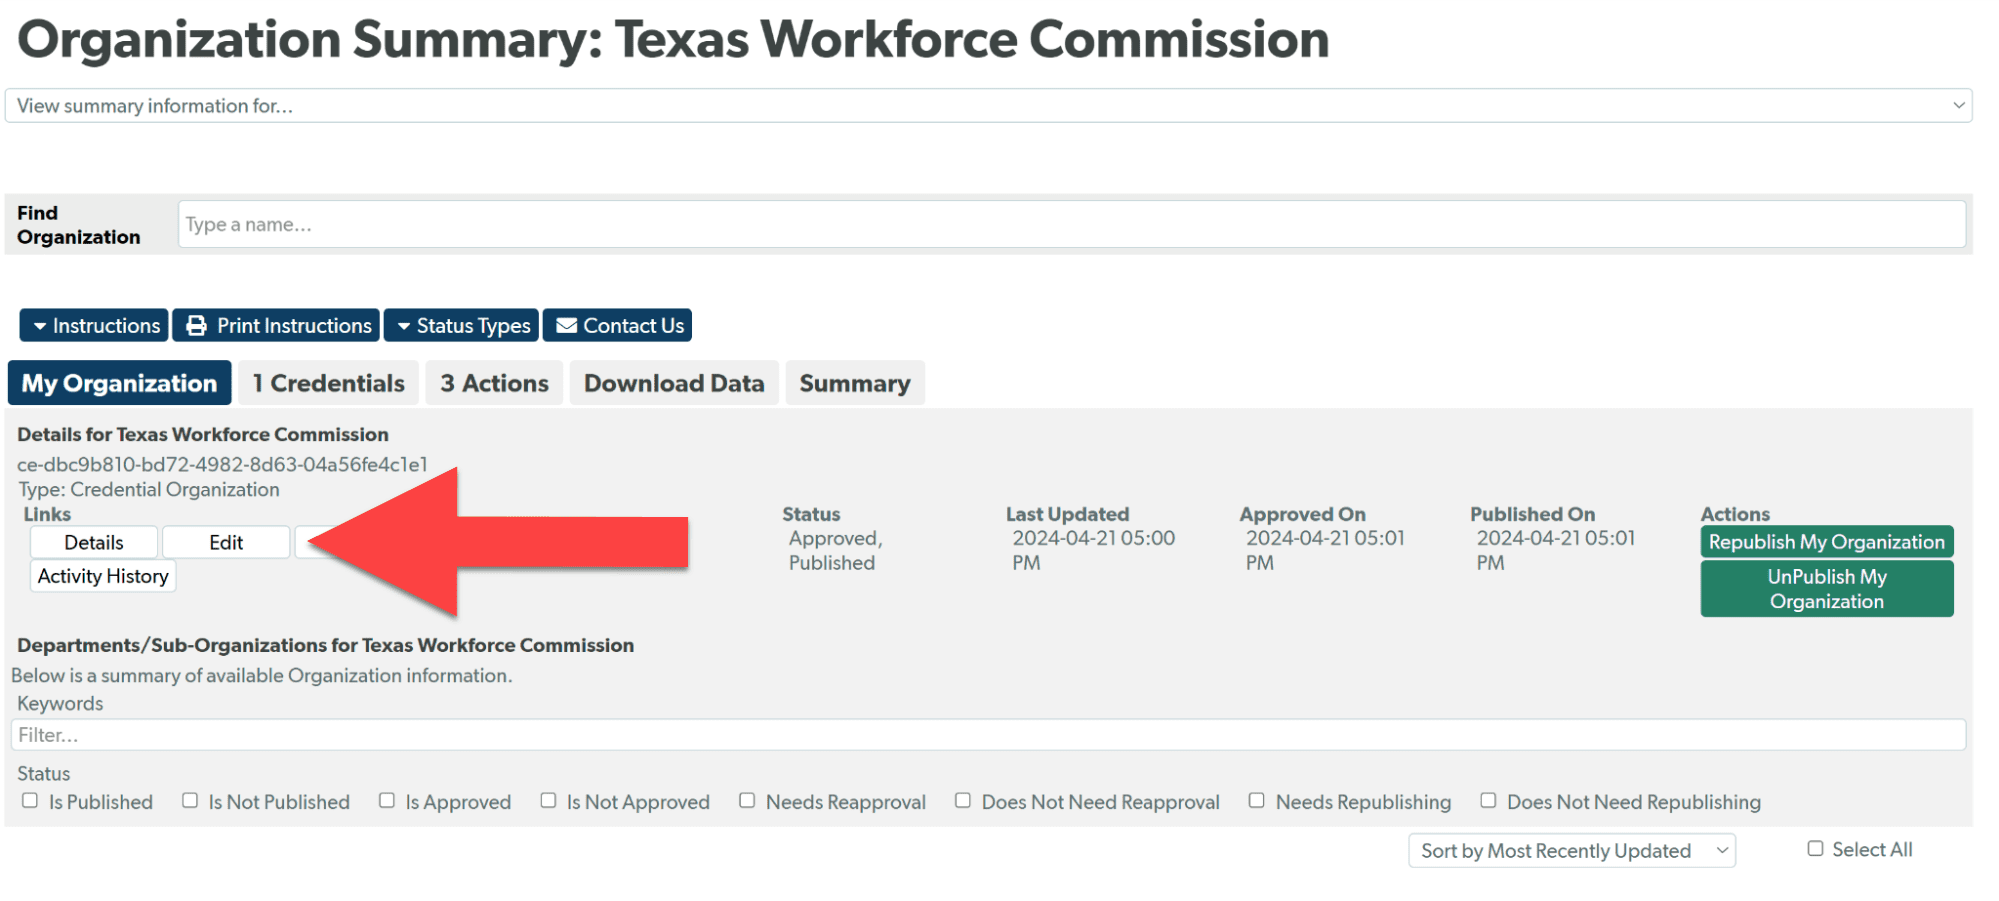
- Select “Edit” in your “My Organization” tab.
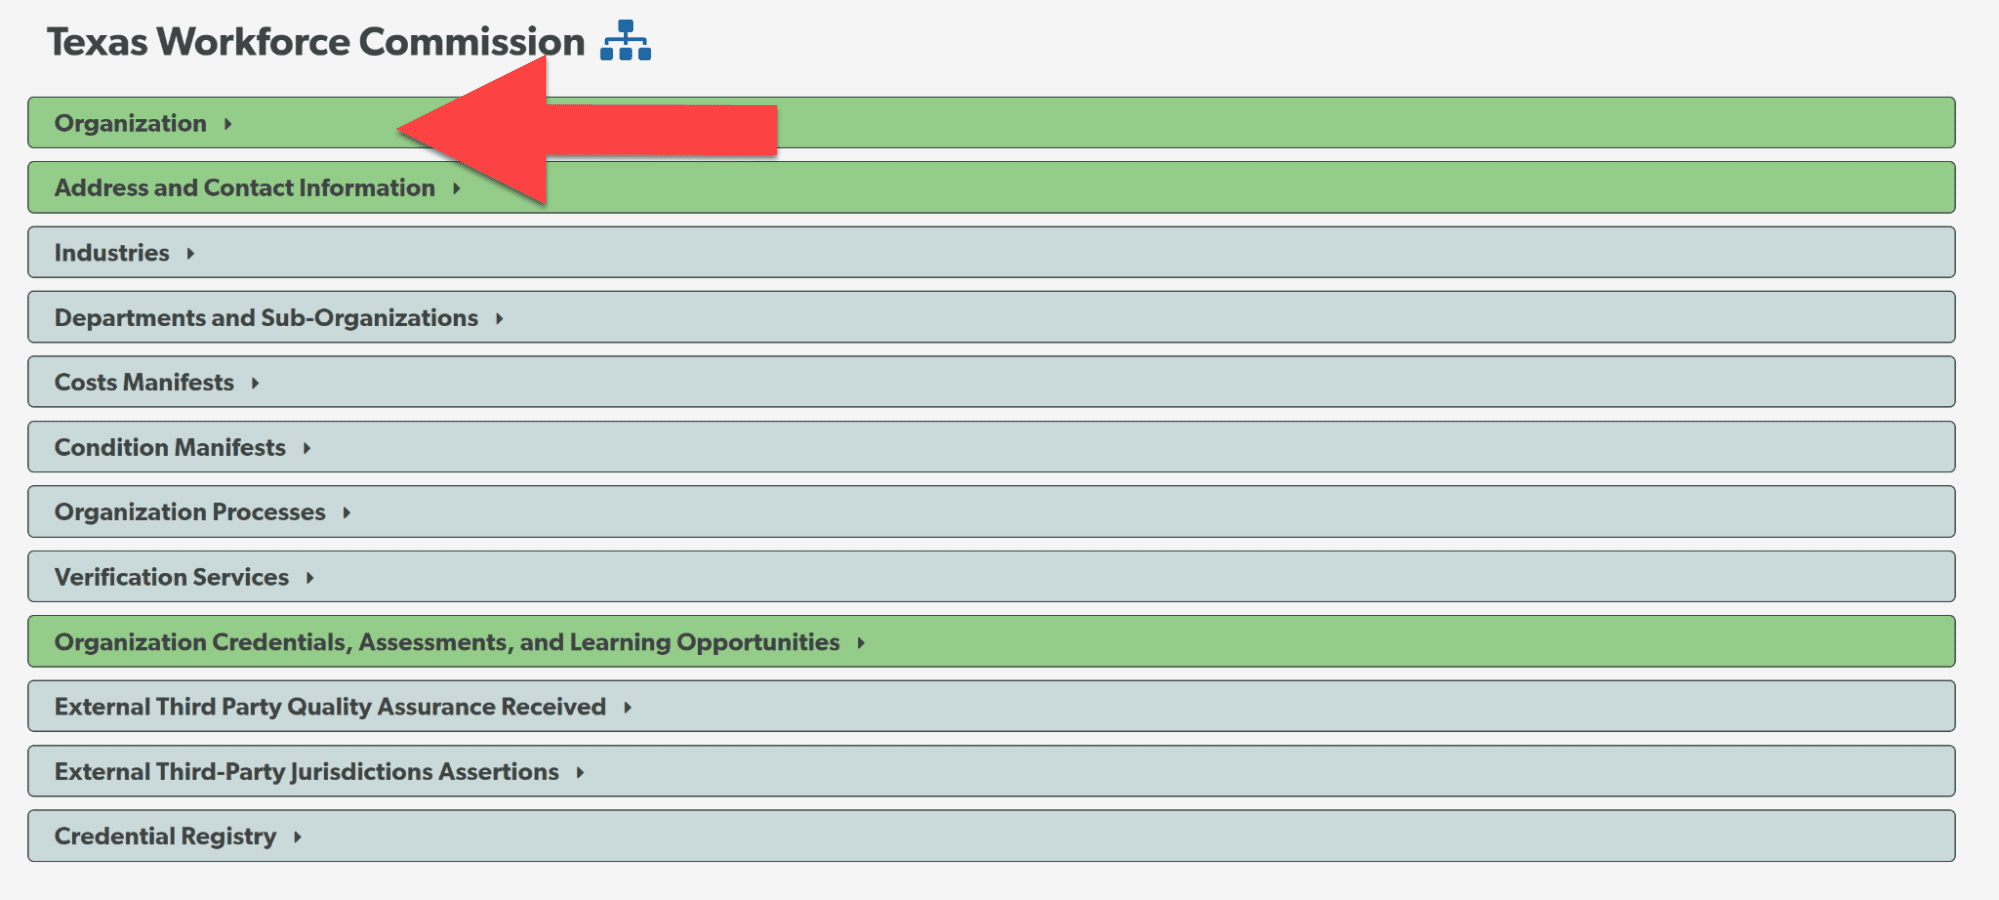
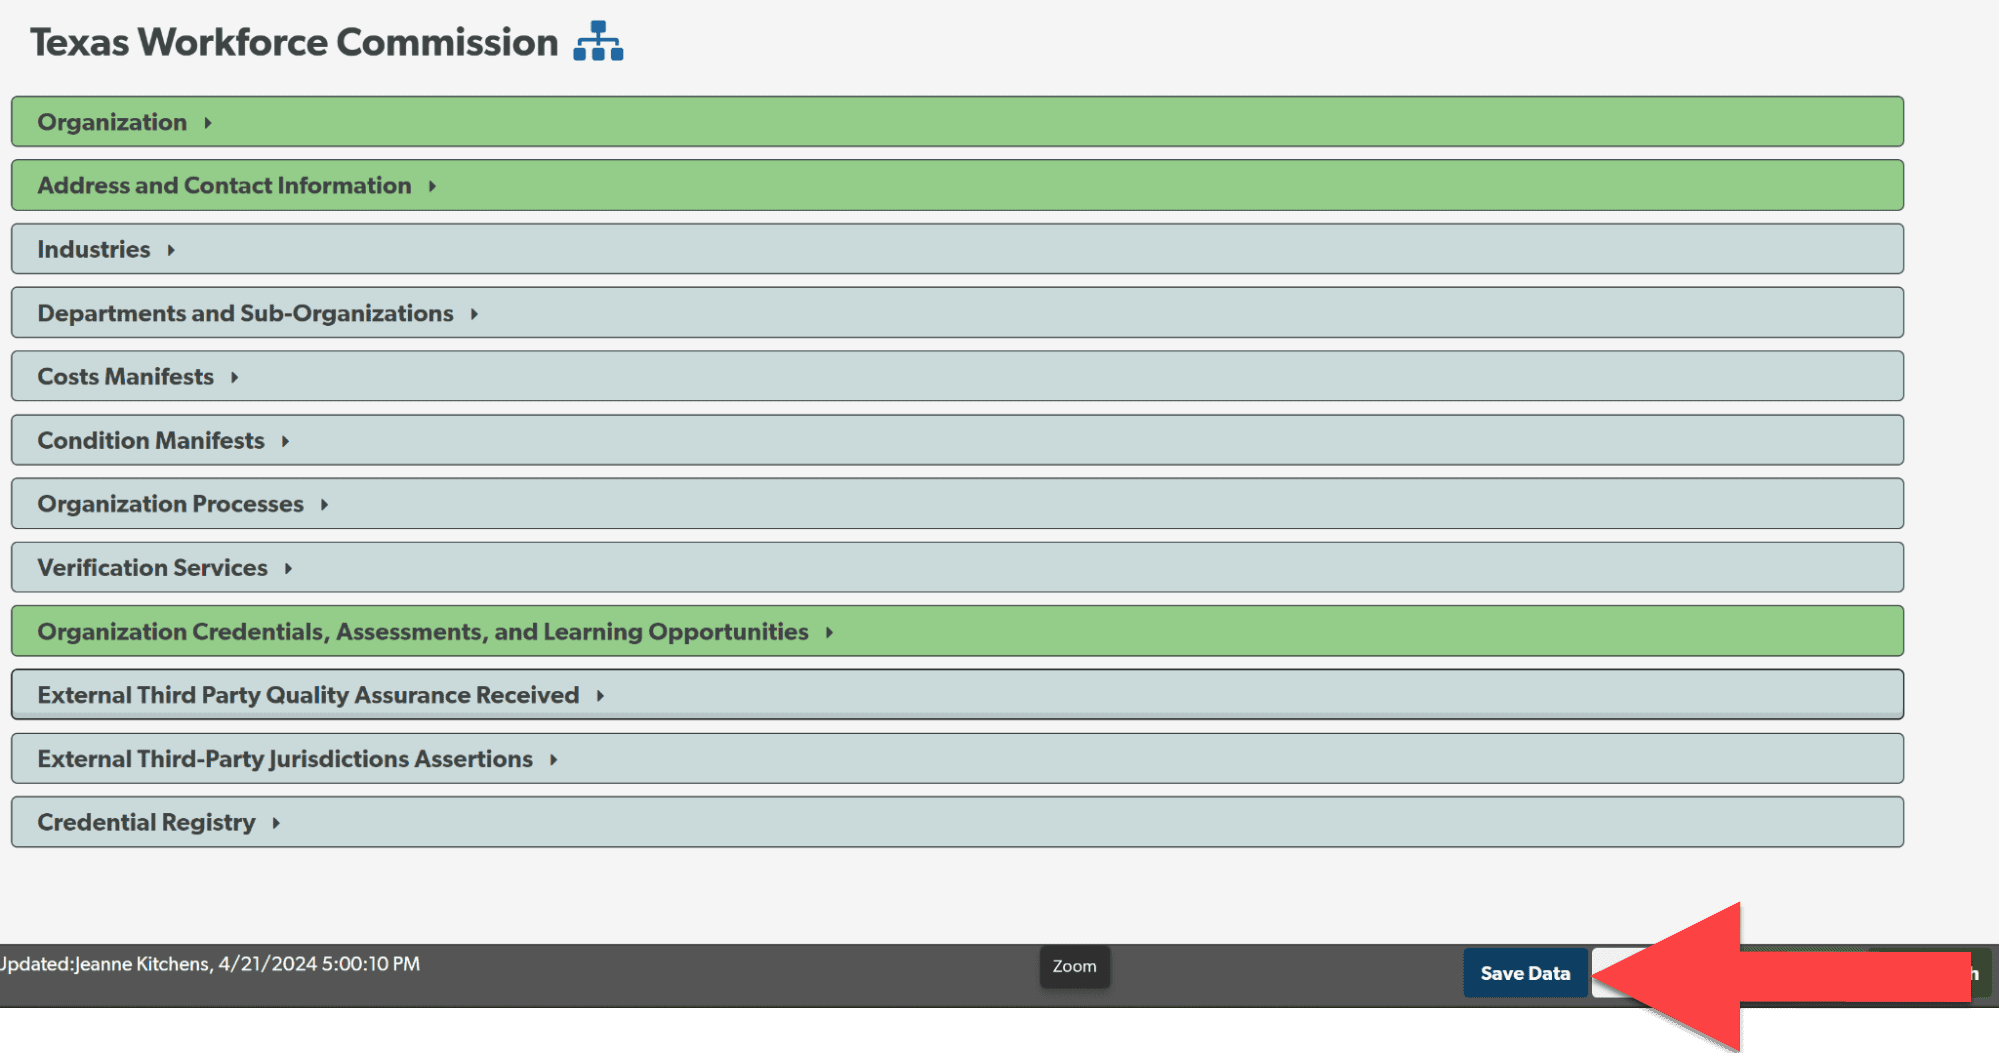
- Open the “Organization” panel to add any additional information about your organization. For all panels, items with a red label are required. Open other panels to see what information can be included and add information if applicable. Be sure to select “Save Data” at the bottom, right of the page as you complete information in a panel.
Green panels have information saved in them. Gray panels are empty.
- You may be interested in adding additional information in the “Organization Processes” panel. For each of the types of Process Profiles, select “Add new [type] Process.” This will open a modal window to be filled in. Fill in required any additional information relevant to each process for your organization, such as:
-
- Maintenance Process
- Administration Process
- Development Process
- Review Process
- Revocation Process
- Appeal Process
- Complaint Process
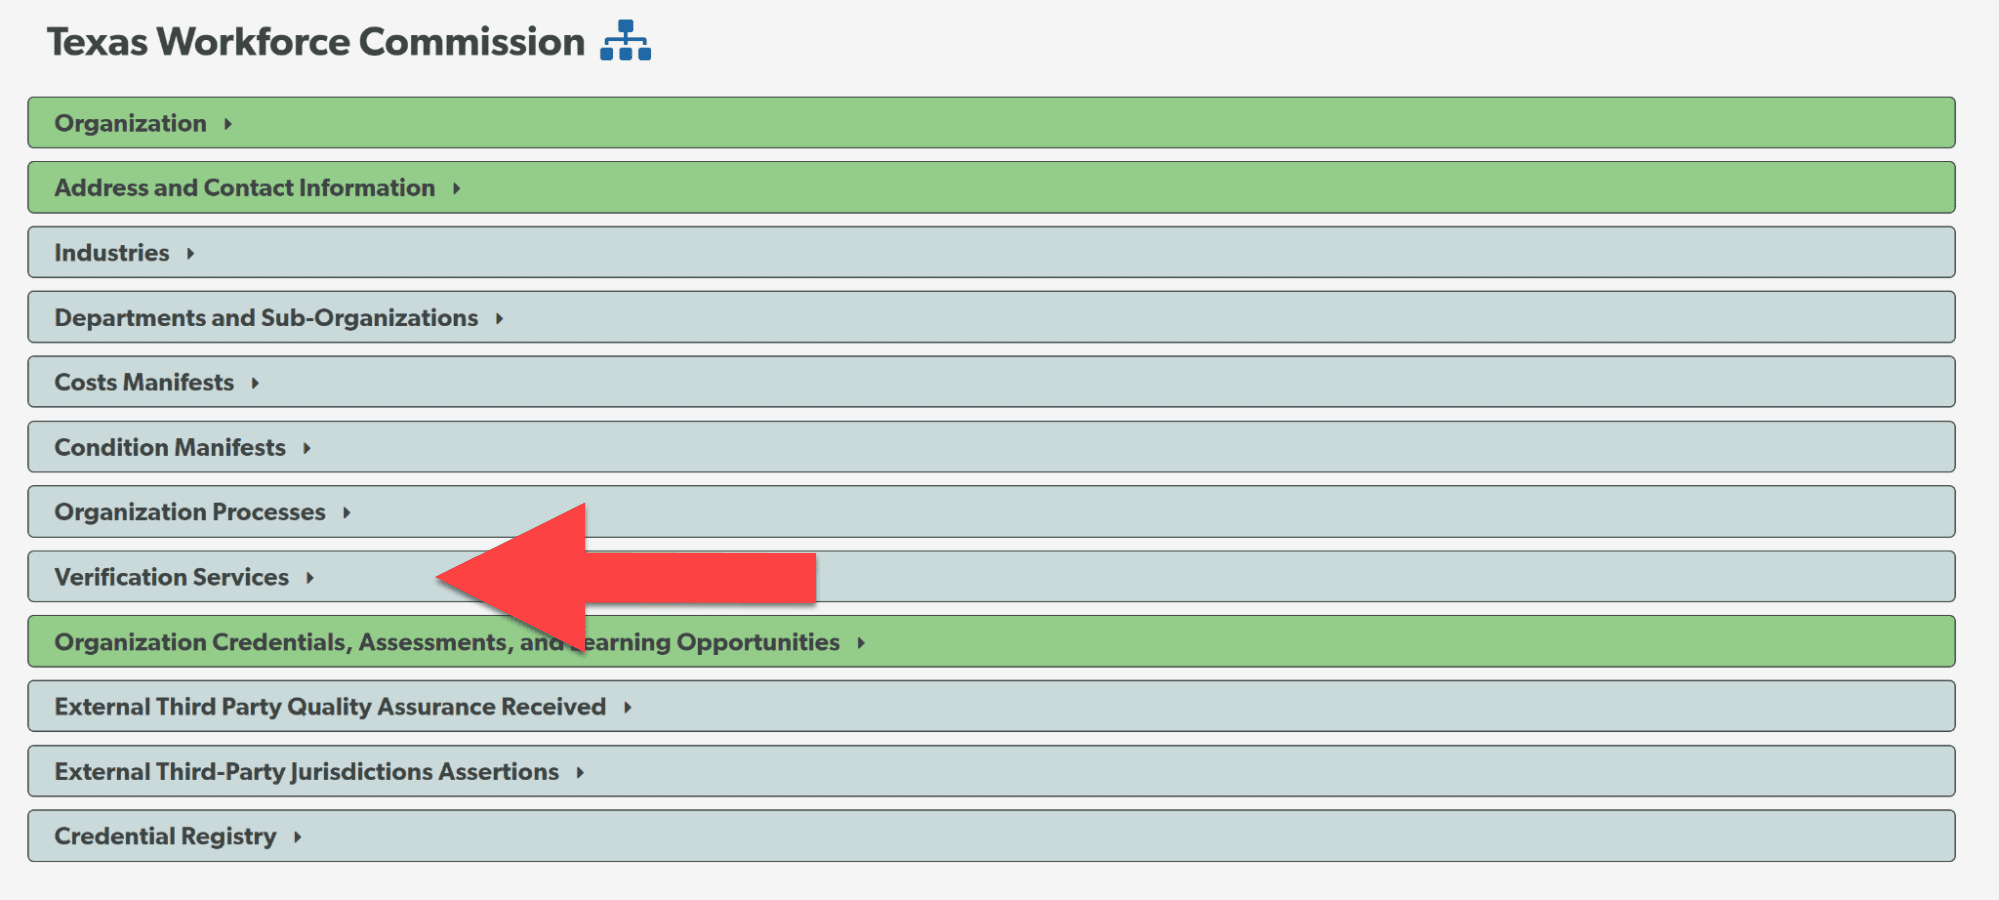
You may be interested in adding additional information in the “Verification Services” panel. Select “Add a Verification Profile”. This will open a modal window to be filled in. Fill in required any additional information relevant to your organizations’ Verification Services.
Be sure to “Save and Close” as you complete the information in the panel.
-
- Publish Your Organization updates. Navigate to your Organization Summary page (see step 2 above) and select “Reapprove My Organization”.
Publish the Quality Assurance Credentials your organization offers via manual entry
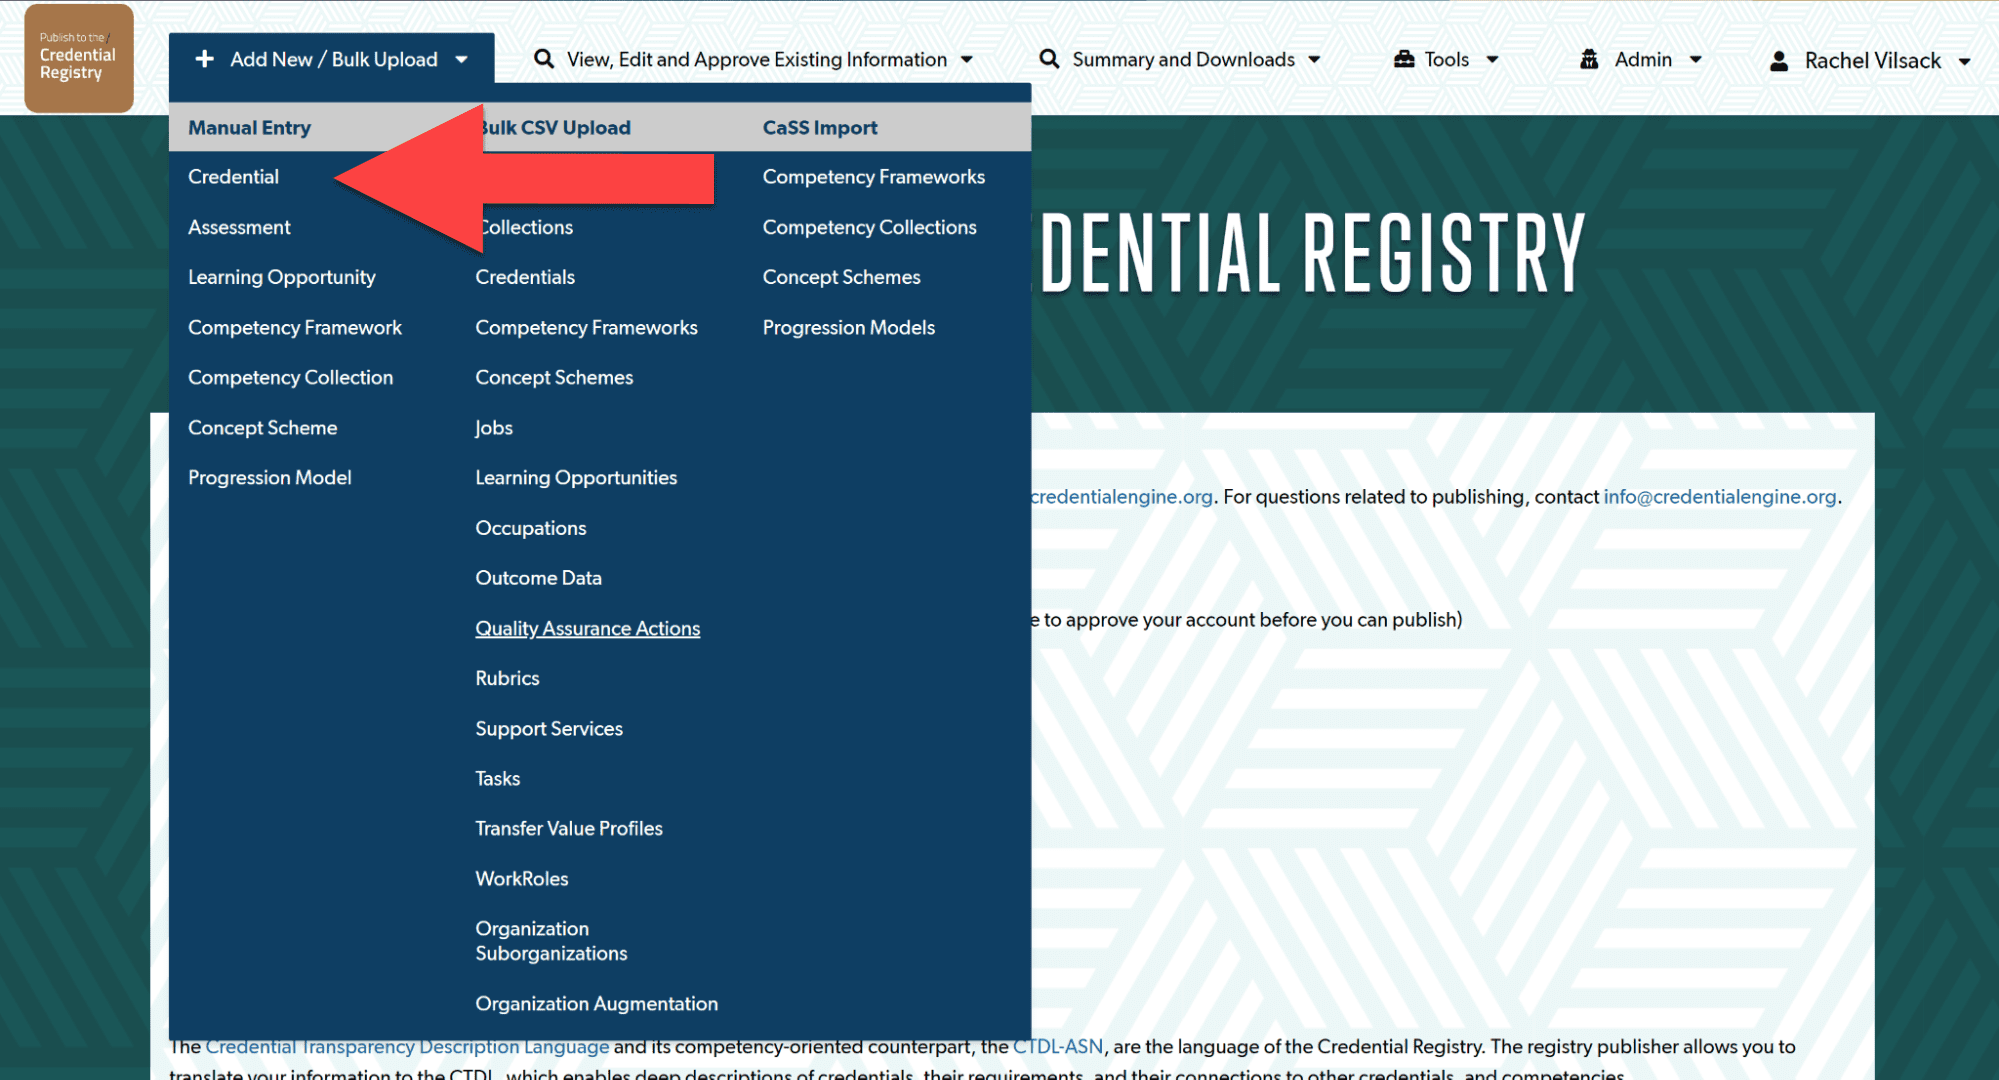
- Log in to the Credential Engine Publisher (https://apps.credentialengine.org/publisher). Expand the “Add New/Bulk Upload” menu and select “Credential” under the “Manual Entry” heading.
- There is minimum data necessary for publishing to the Registry. Required properties for publishing certifications are in red.
Enter the title of the Quality Assurance credential you issue in the designated field labeled “Credential Name”.
Provide a summary of the described Quality Assurance credential in the field labeled “Credential Description”.
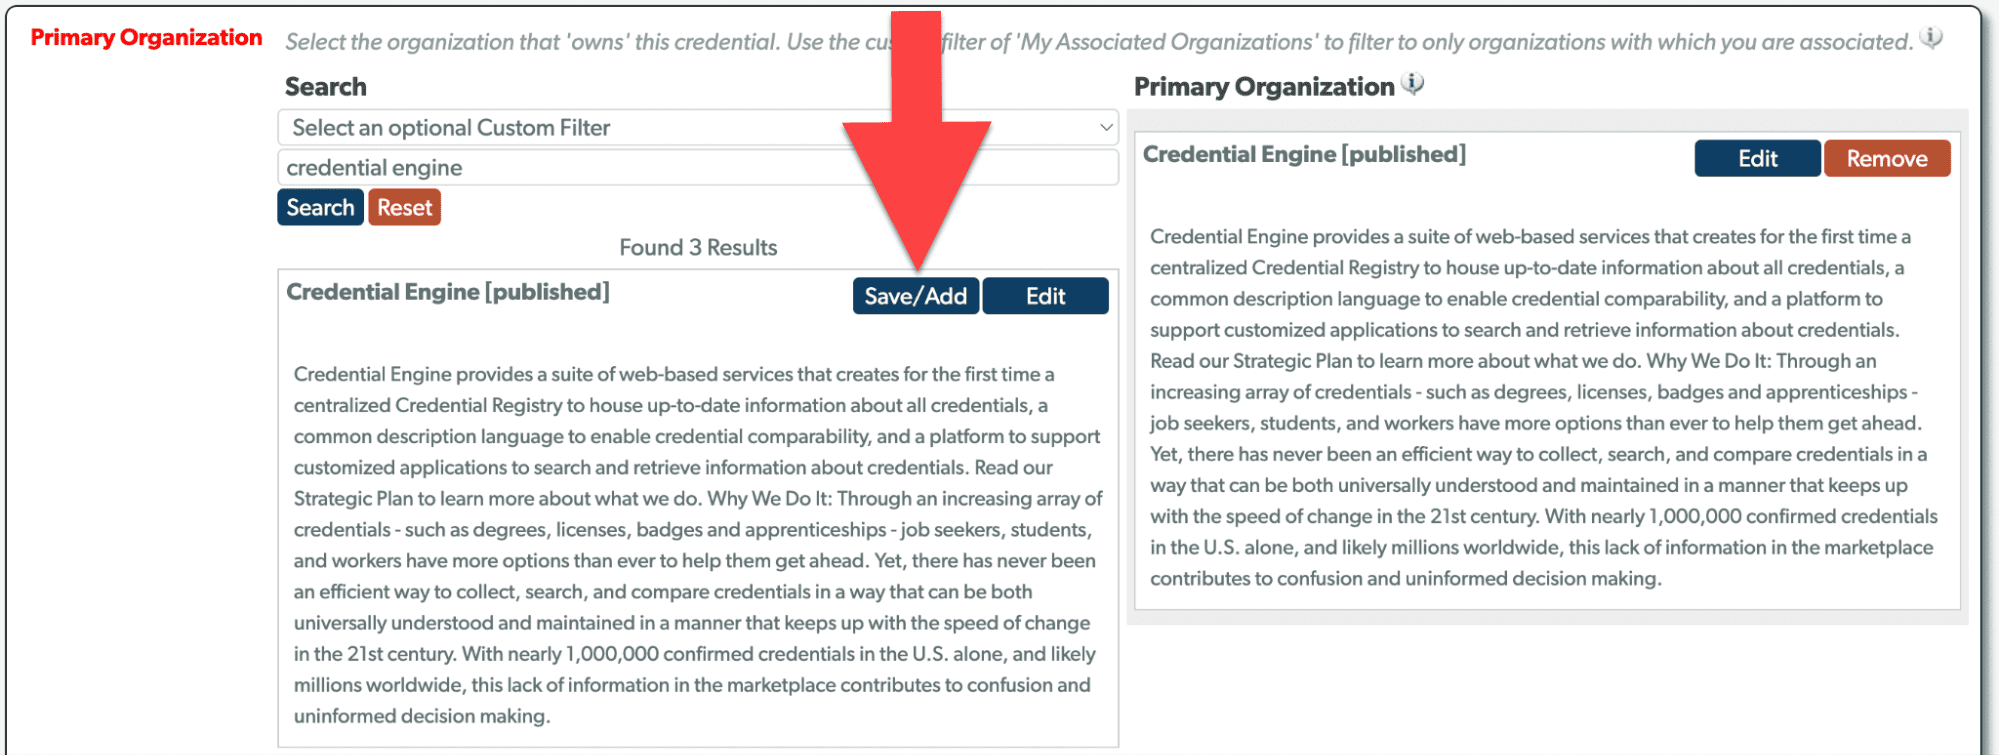
In the “Owning Organization” field, use the search bar labeled “Search” to locate the appropriate owning organization, which is likely the organization you are representing. Once you have found the correct organization, click on the “Save/Add” button to add it to the “Owning Organization” column.
Choose the relevant roles for the selected owning organization’s relationship with the credential in the field labeled “Roles for Owning Organization”. Typically, the owning organization also provides the credential.
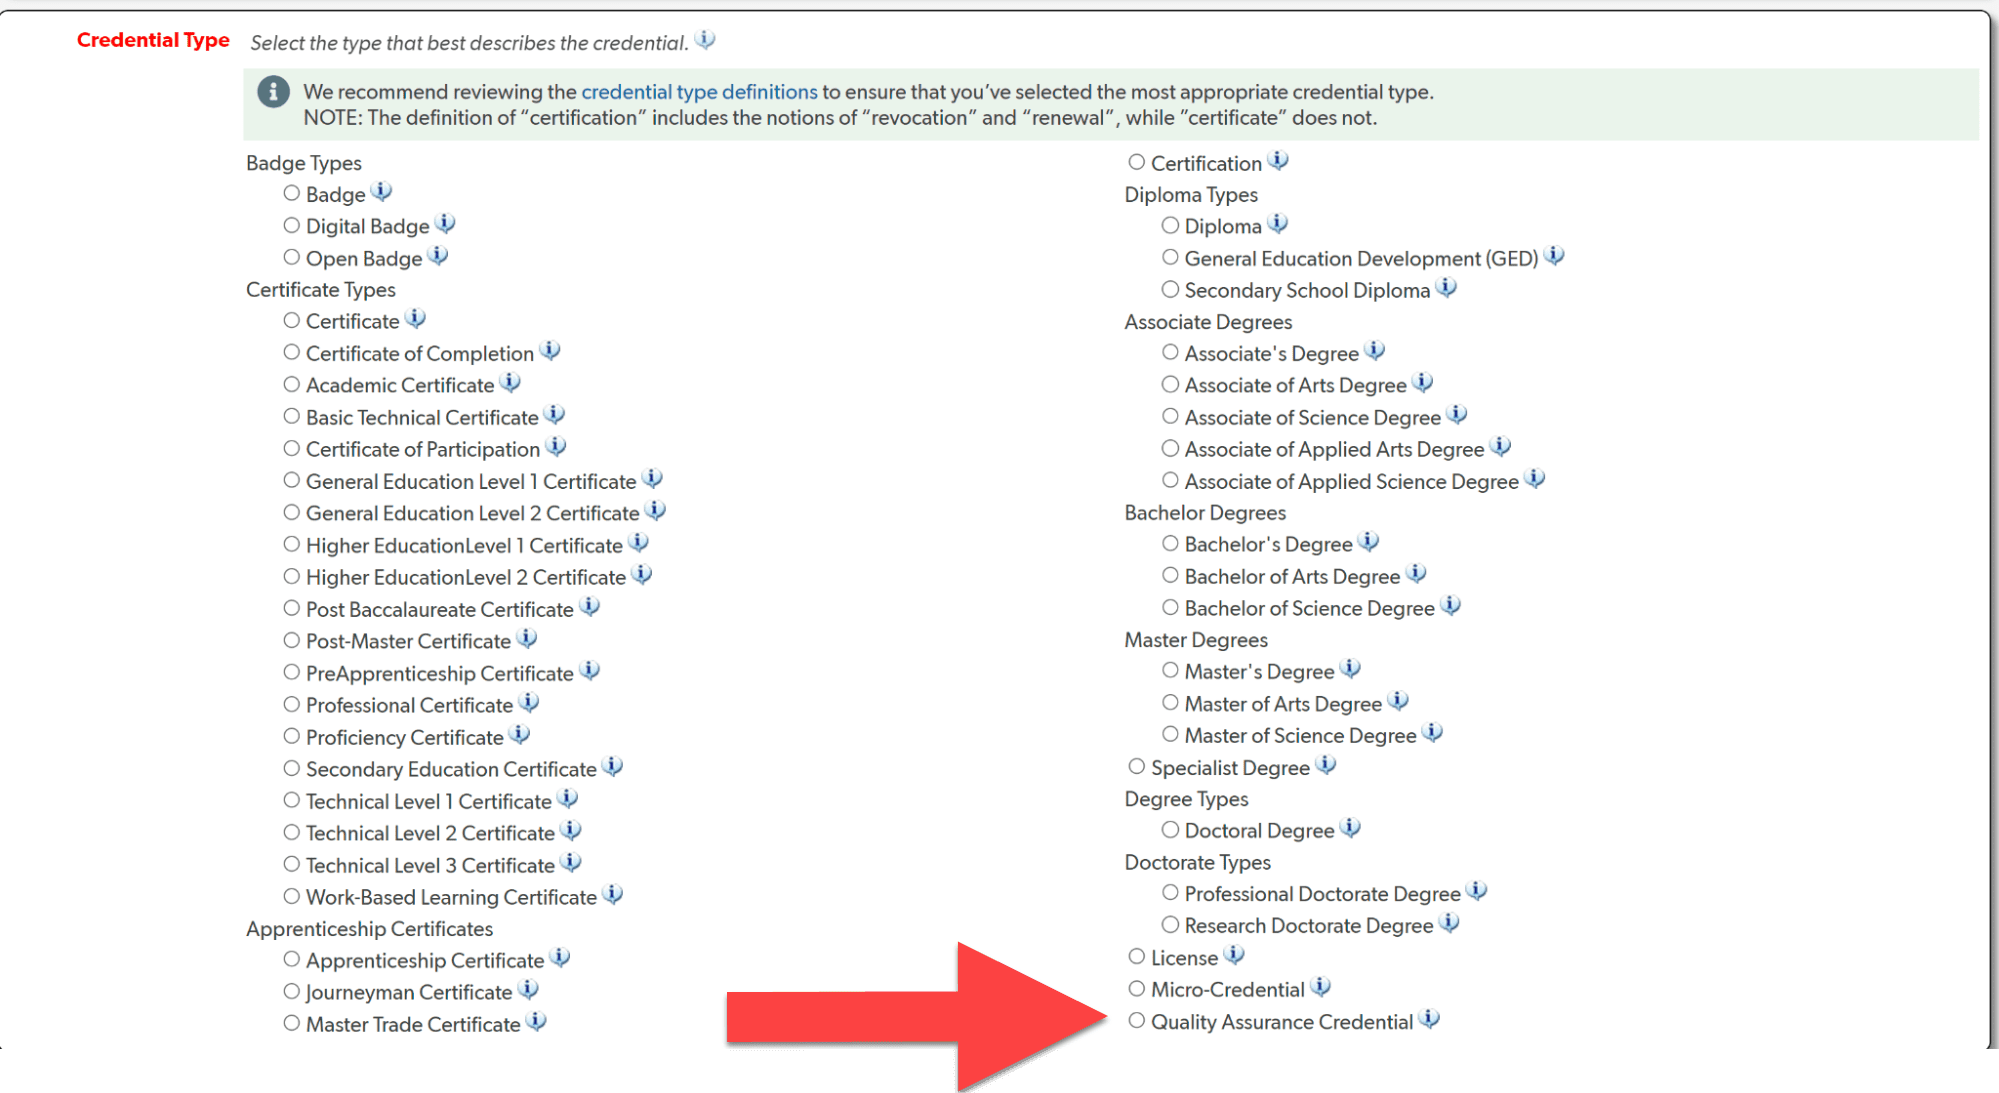
Select “Quality Assurance Credential” type from the list labeled “Credential Type”.
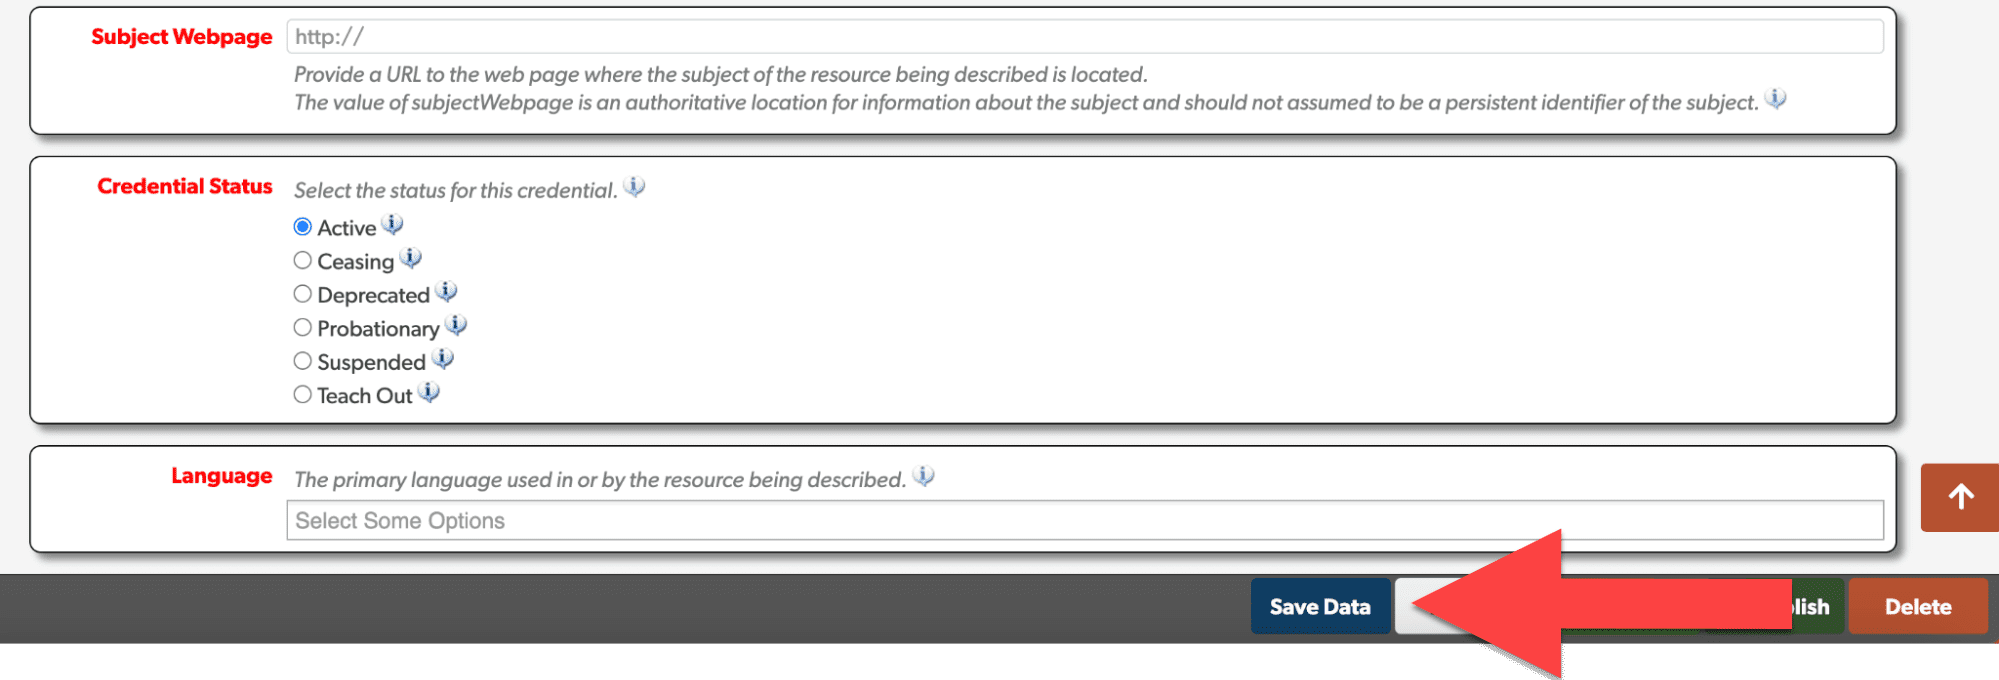
In the “Subject Webpage” field, enter the web address that provides a description or summary of the Quality Assurance Credential you provide. This URL should direct individuals to a webpage specifically dedicated to providing more details about the credential, rather than the organization itself.
In the field labeled “Credential Status”, specify the current status of the credential. If the credential is currently available and being offered, select “Active” as the status.
Enter the primary language used in or by the credential being described. The language entered will be displayed in a drop-down menu for selection.
To store all the data you have entered, save it to the Publisher by clicking on the “Save Data” button located at the bottom of the screen.When you’re done, select “Save this Data” located at the bottom of the editor. - The next step is to approve your Quality Assurance credentials for publishing to the Credential Registry. Navigate to your Organization Summary by selecting the “Organization Summary and Download” options under the “Summary and Downloads” menu.
On your Organization Summary Page, select the “Credentials” tab. The “Credentials” tab will display all of your uploaded credentials. To easily approve your credential data, select the “Select All” button located on the right-hand side of the screen. This will select all your credential data to be approved at one time. Once the credentials have been selected, click on the green “Approve All Selected Items” button located at the bottom of the screen.


Publish Quality Assurance Actions
- After you have published your Quality Assurance credential(s), you can now add Quality Assurance Actions, or the
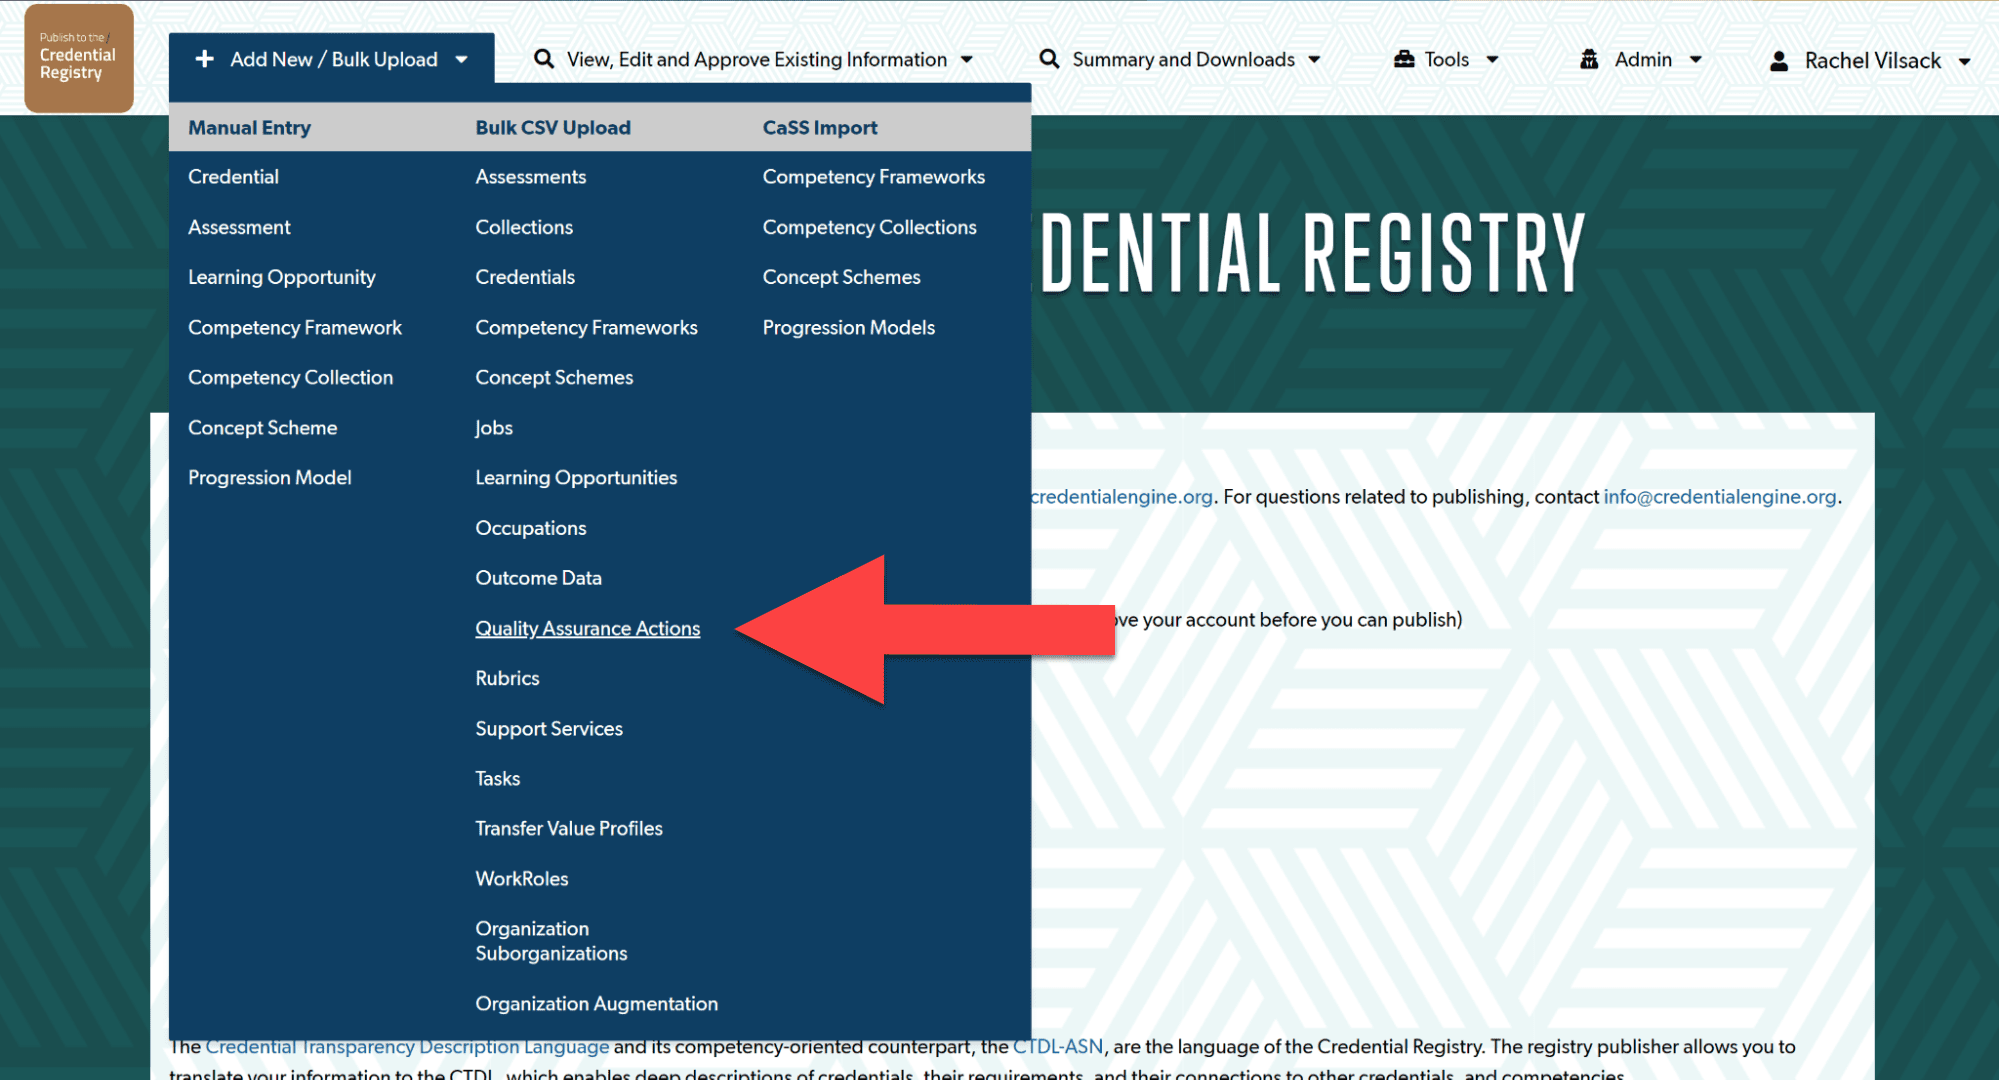
Access the Quality Assurance Bulk Upload tool by visiting the Credential Engine Publisher (https://apps.credentialengine.org/publisher) and select the “Quality Assurance Actions” selection open under the Bulk CSV Upload column (or middle column).
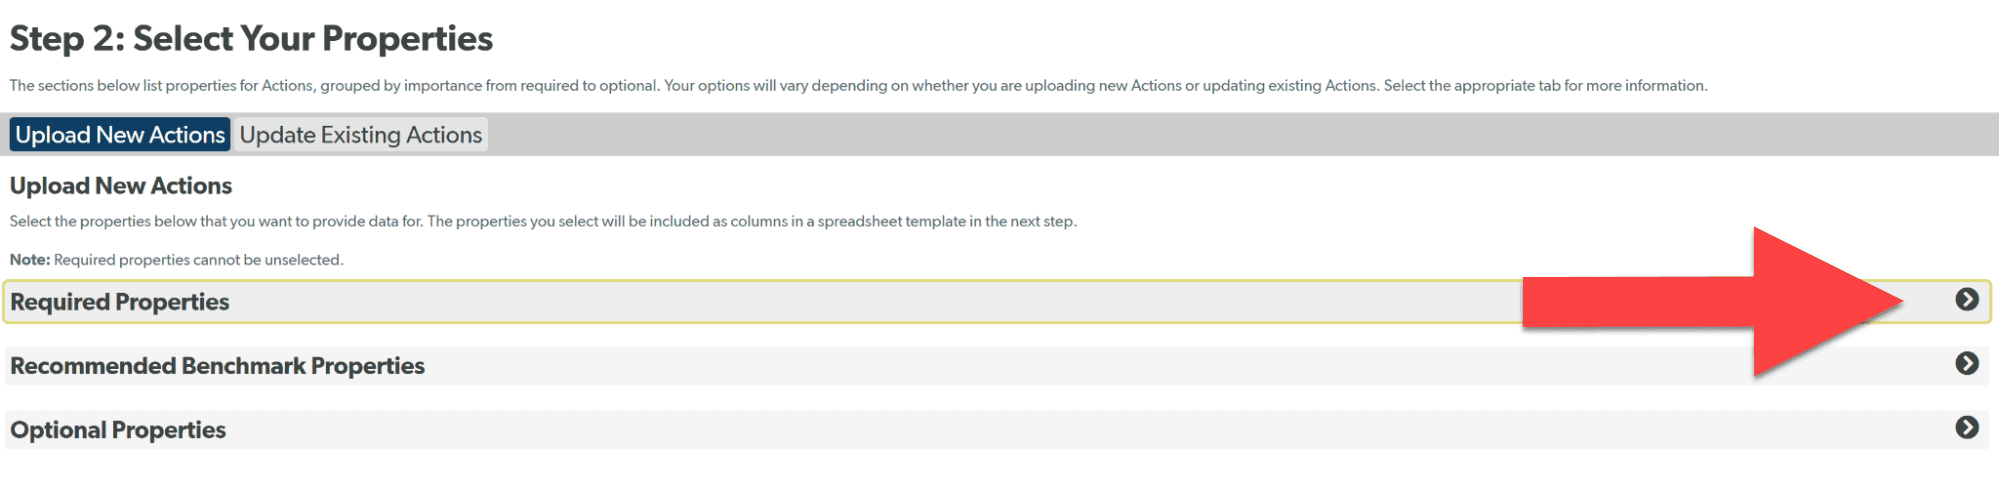
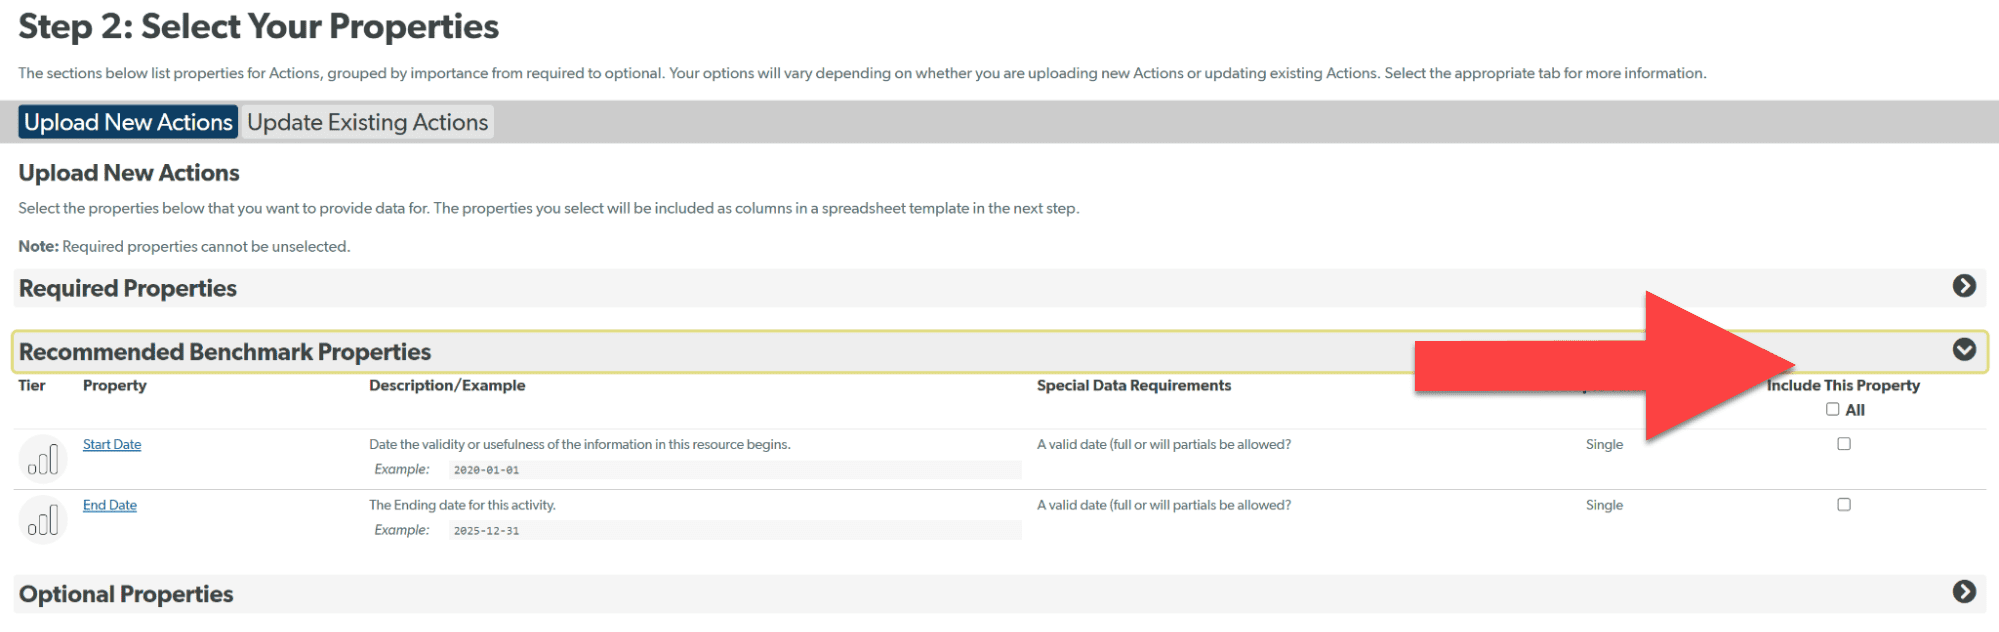
- On the Actions Bulk Upload tool, scroll down to Step 2. Here is where you can select the properties of the actions you want to publish to the Credential Registry. Expand the arrow associated with Required Properties to see the minimum data elements that will be needed. These properties will be included in your Action Bulk Upload CSV template download.
- You may include additional information about your Quality Assurance Actions. Expand additional menu options to see other properties. Descriptions and examples are provided, along with special data requirements. To add a property to your Actions Bulk Upload CSV template, select the “Include This Property” check box for the necessary property.
- Once you have reviewed and selected the properties that you’d like to publish to the Credential Registry, scroll down to Step 3. Here you will download your Actions Bulk Upload CSV template spreadsheet. It is recommended that you include sample data and instructions. Then select the “Download Template Spreadsheet” button.
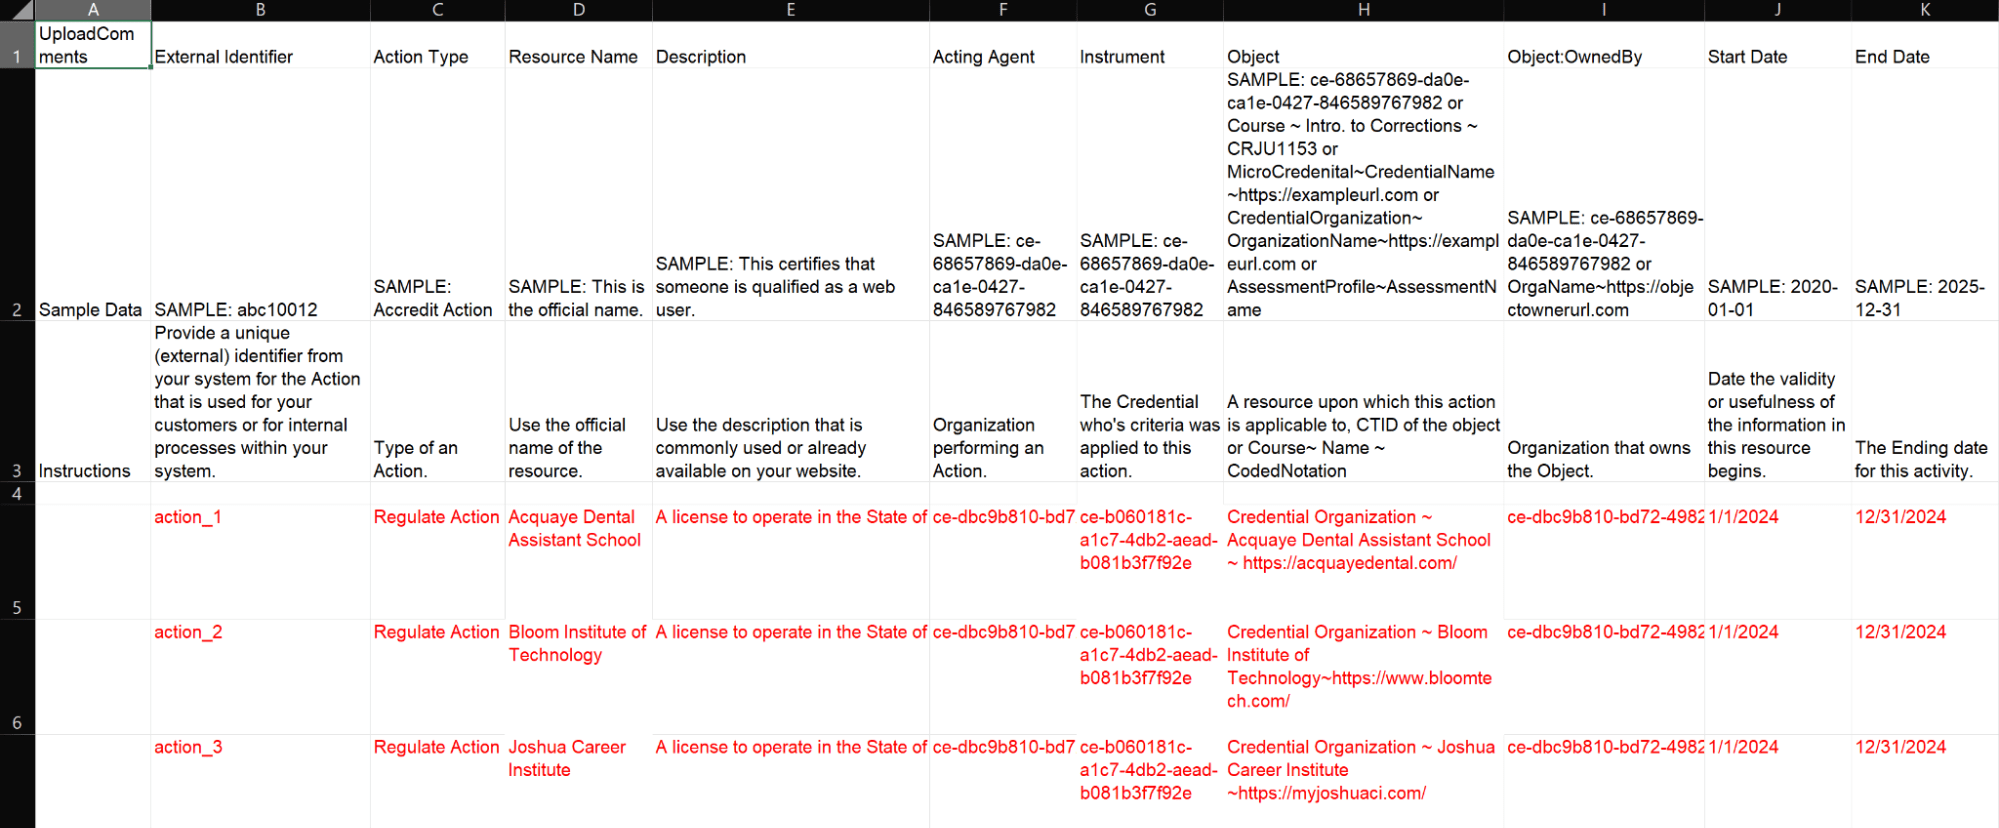
- Open your Bulk Upload CSV template spreadsheet and populate it with information about your Quality Assurance Action. Enter one Action per row. Some properties have a list of available selection options. Refer to the special data requirements in the Actions Bulk Upload tool page (see step 3 above).
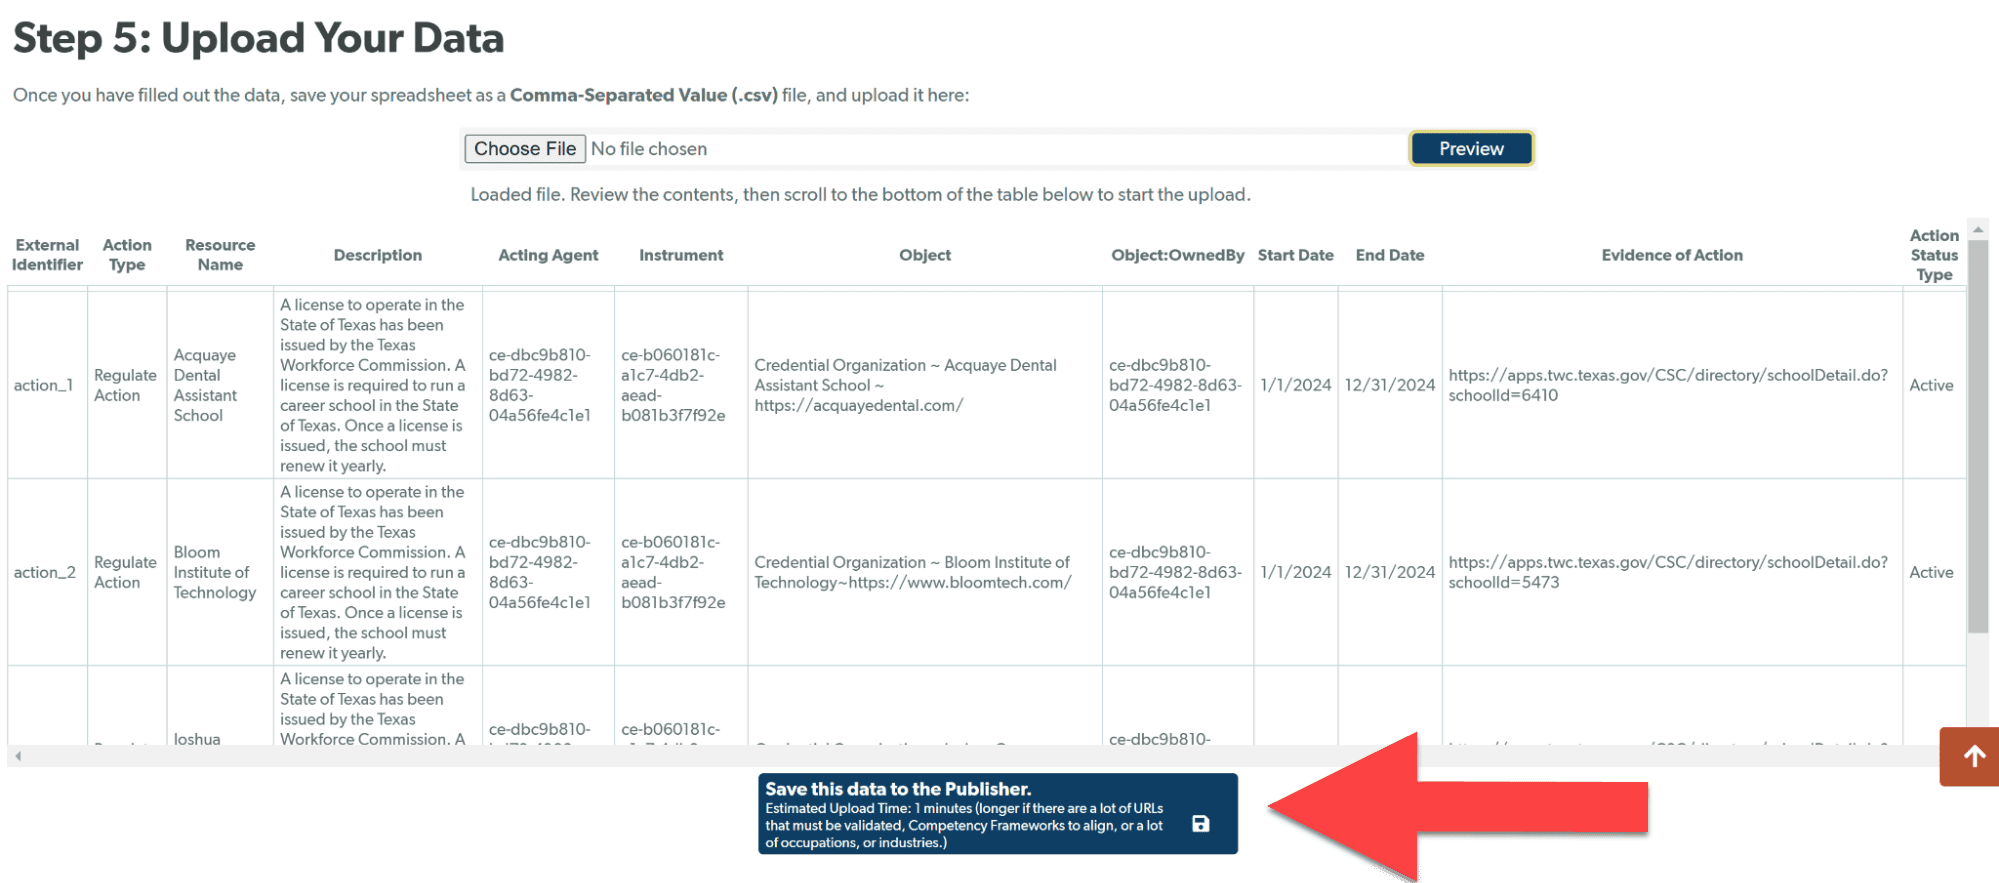
One important note, the “Instrument” referred to in a Quality Assurance Action is the Quality Assurance Credentials your organization offers. You will need to publish Quality Assurance Credentials first, as you’ll point to the CTID of that Quality Assurance Credential in the “Instrument” column. - Once you have populated your Actions Bulk Upload CSV template, Save the file as a CSV format. On the Credential Bulk Upload page, scroll down the page to Step 5: Upload Your Data. Select the “Choose File” button to find your updated CSV file.
Click the “Preview” button to display the CSV file.
Review the CSV file in the preview window provided. When ready, select the “Save this data to the Publisher” button. Based on the amount of data in your file, a time estimate is provided for how long the data file will take to upload. - Once the upload is complete, the final step is to approve your data to be published. From the navigation bar at the top of the page, click on the dropdown menu labeled “Summary and Downloads”. From there, select “Organization Summary and Downloads” to be directed to your Organization Summary Page.
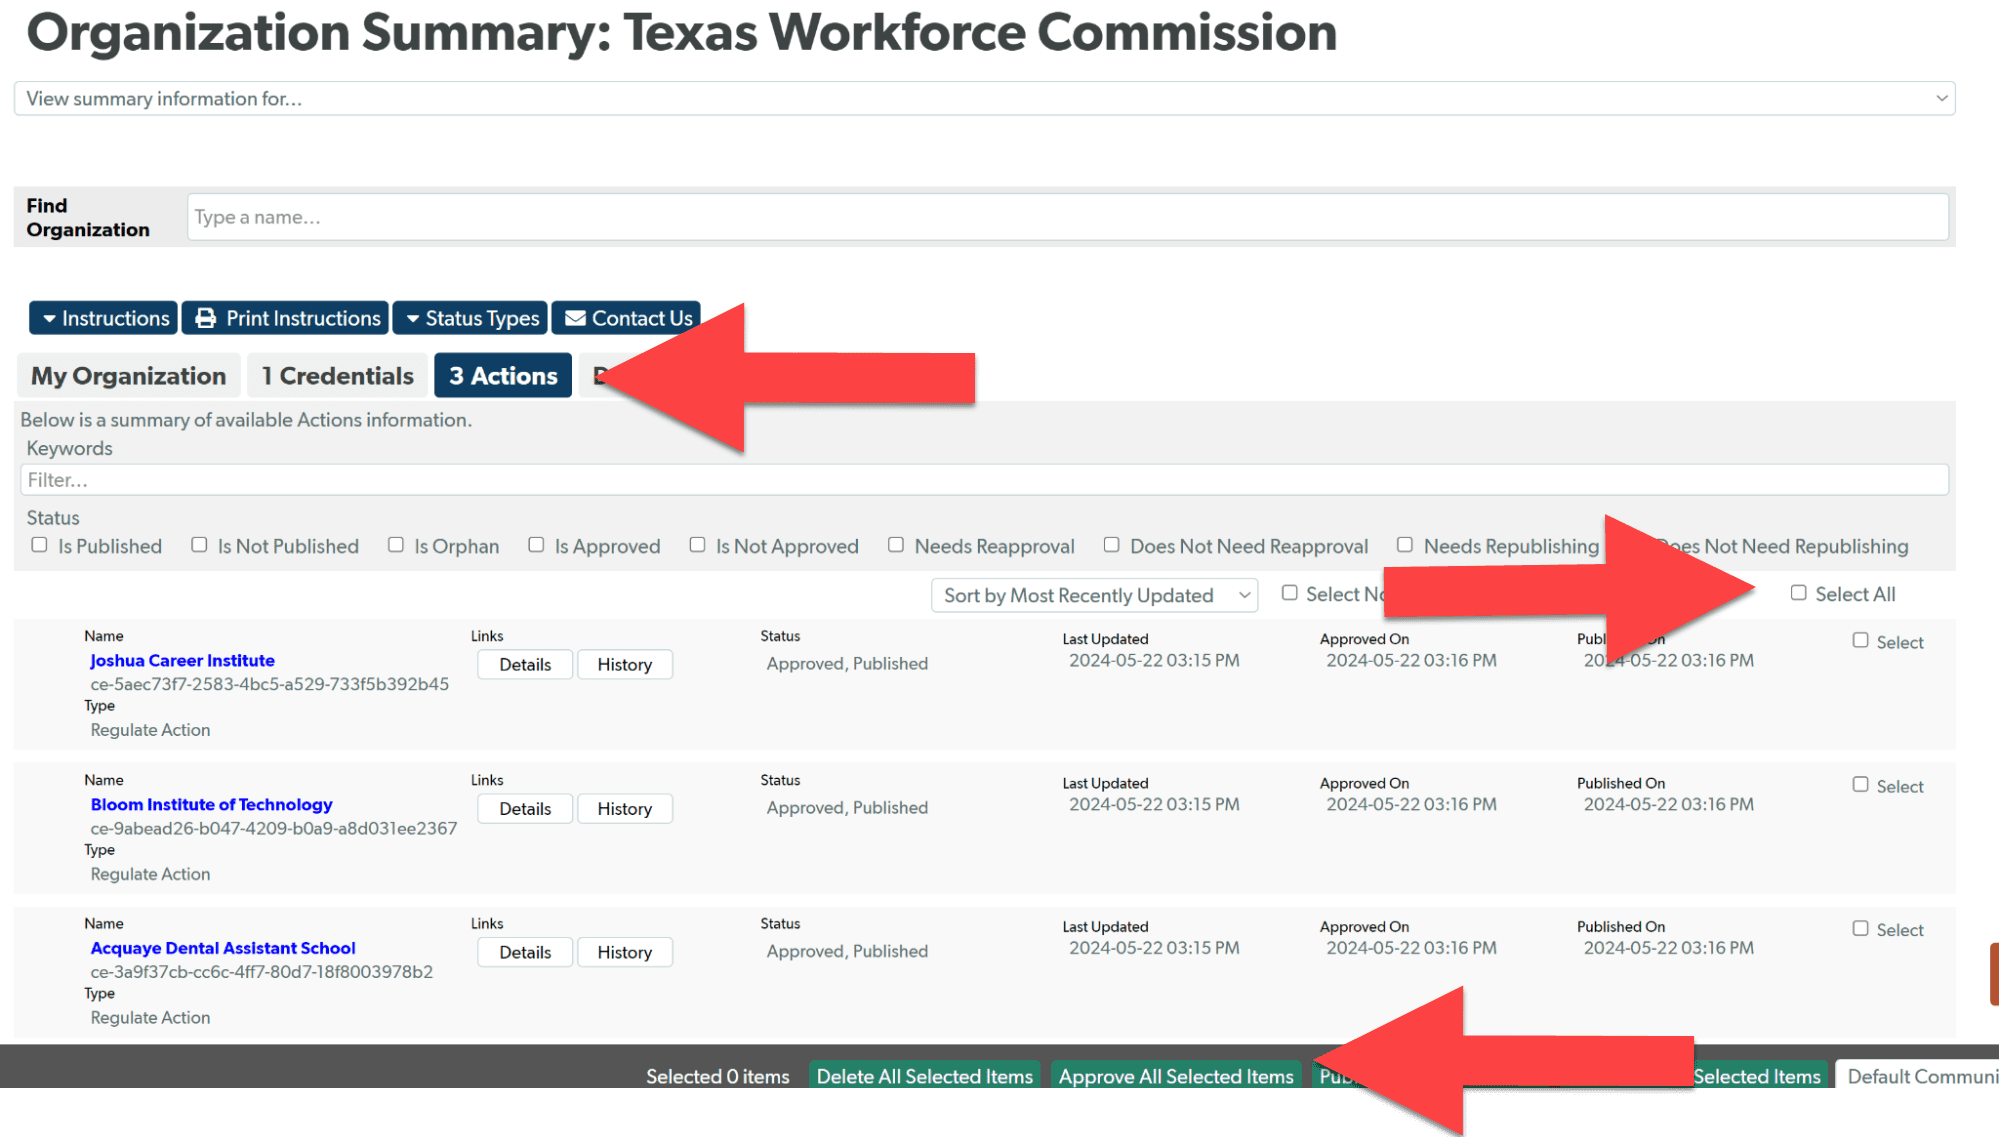
- Your final step is to approve your Quality Assurance Actions for publishing to the Credential Registry. Navigate to your Organization Summary by selecting the “Organization Summary and Download” options under the “Summary and Downloads” menu.
Select the “Actions” tab. Click the “Select” checkbox next to the appropriate action(s) and then select the “Approve All Selected Items” button.


If you need assistance or have additional questions, please contact the Credential Engine Partner Success team at publishing@credentialengine.org.