The following instructions explain what a Collection is and how to enter a new collection via Bulk Upload with minimum data necessary for publishing to the Credential Registry.
Please contact the Credential Engine publishing team at publishing@credentialengine.org for assistance.
What is a Collection?
A Collection is an aggregation, or grouping, of related resources in the Credential Registry. As the name indicates, it is a resource that “collects” already existing instances of resource types, such as credentials, learning programs, courses, or competencies.
A Collection is very helpful in giving context to resources in the Registry. State agencies and boards, educational systems, and other organizations, are tasked with providing an approved list of credentials, assessments, learning opportunities, and related competencies that are recognized by an organization or entity as meeting the requirements for some purpose.
Some examples collections of credentials or other resources include:
- Eligible Training Provider List (ETPL)
- Industry-Recognized
- Perkins
- Promise Scholarship
- Quality
- State Approved Postsecondary
The Credential Transparency Description Language (CTDL) enables capturing this kind of information via Collections, which provides both the capability of creating a list of resources and describing that list. Resources can be added or removed from a collection.
We strongly recommend creating collections for state approved lists of credentials. This will help users of Registry data understand the approval that a state agency, board, or system has given to credentials, learning opportunities, or other resources in the Registry.
Additionally, if you are consuming Registry data in student or learner tools, collections will help you manage which credentials, learning opportunities, or other resources are actively a part of a collection versus the other credentials, learning opportunities or other resources that you publish to the Registry.
Creating and Publishing a Collection Via Bulk Upload
There are two ways to create and publish a collection to the Registry: using the Bulk Upload tool or API. These instructions pertain to creating a collection via Bulk Upload.
Since collections refer to already existing resources in the Credential Registry, please make sure that any credentials, learning opportunities, or other resources you would like to include in your collection are published.
If you would like to add a collection to your already existing API, or would like technical support in developing an API to publish to the Credential Registry, please contact the Credential Engine publishing team at publishing@credentialengine.org for assistance.
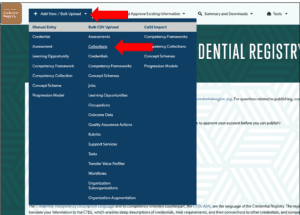
- Log into the Publisher (https://apps.credentialengine.org/publisher) and navigate to the “Add New / Bulk Upload” heading in the upper left menu. Expand the heading and select “Collections” from the Bulk CSV Upload (center) column.

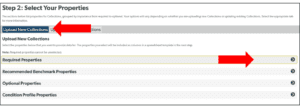
- On your organization’s Bulk Upload tool page, scroll down to Step 2 to select the properties for uploading your new collection. Make sure the “Upload New Collections” tab is selected.
Like any resource published to the Credential Registry, a collection requires a set of minimum data that must be included in order to publish. Expand the “Required Properties” dropdown to view the required information. The Credential Engine team encourages users to include any additional information that is relevant to your collection. You can review the collection and collection member minimum and benchmark data policies here (https://credreg.net/registry/policy#collection_collectionmember). - Required properties of a collection include an external identifier, the name of a collection, a description of the collection, the life cycle status type of a collection, and the components of a collection (i.e., collection members). All of these properties will be included when you download your collection template.
- Additional properties should also be included. In the Recommended Benchmark Properties dropdown, you can also select a collection type (like Eligible Training Provider List), collection members (e.g., CTIDs of credentials, learning opportunities, or other resources) that are part of this collection, and the start and end date of the resources.
In some cases, it is necessary to indicate when a given resource’s membership in a list begins and/or ends. In these cases, you should only use CollectionMember if you need to indicate the start dates or end dates of that resource’s membership in that collection.
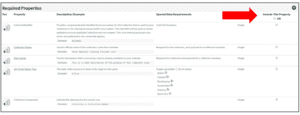
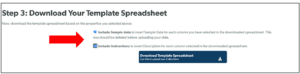
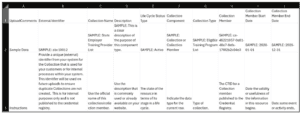
Select any additional properties you would like to include with your collection, by selecting the checkbox to the right of the property description. This will ensure the property is included in the collection template. - When you’ve selected all the properties you’d like to include, scroll down to Step 3 to download your template spreadsheet. It is recommended that you select the two check boxes to include sample data and instructions before you download the template spreadsheet.
- Once you have downloaded your spreadsheet, open it to begin populating it with the necessary information. Sample data and instructions have been provided.
- Fill out your template spreadsheet.
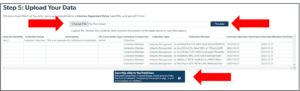
Use one (1) row to describe your collection (external identifier, name, description, life cycle status, and collection time. For each resource you want to include in the collection, use a separate row to indicate the collection component (i.e., Collection Member) and its corresponding CTID. When you have completed filling out the required information. Delete column A and the first two rows of upload comments and sample data. - Save your file as a CSV and return to your organization’s Collections Bulk Upload page. Scroll to Step 5 where you will upload your file.
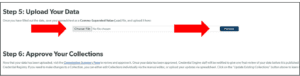
- Upload your file using the “Choose File” button and then preview it before uploading.
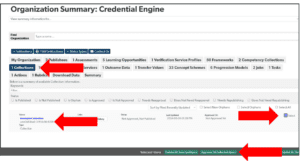
- Once your collection is uploaded, you will need to approve it. In the top menu, select the “Organization Summary and Downloads” option from the “Summary and Downloads” menu.
- Select the “Collections” tab and find the collection you just uploaded. Approve your collection by clicking the checkbox button to the right of your collection and then click on the “Approve All Selected Item” button in the lower menu. Approving your collection will notify the Credential Engine team to publish your collection.