The following instructions pertain to linking a published competency framework or competency collection to a credential that is published in the Credential Registry. These instructions also work for a published learning opportunity or assessment.
For further instructions or questions, please contact the Credential Engine publishing team at publishing@credentialengine.org.
Connecting Competency Frameworks to a Credential
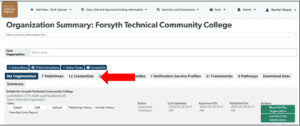
- Log into the Publisher (https://apps.credentialengine.org/publisher) and navigate to the Organization Summary page by selecting the “Organization Summary and Downloads” option in the “Summary and Downloads” menu.

- From your Organization Summary, select the tab for “Credentials”
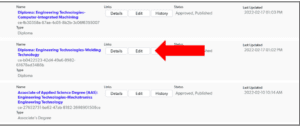
- Select the appropriate Credential and select the “Edit” button.
- In the Edit screen for a credential, there are various panel options that expand to allow for changes to existing CTDL terms, as well as additional CTDL data elements that could be added. Expand the Credential dropdown to see a selection of CTDL terms that can be added or updated, including all the data elements required by Credential Engine’s Minimum Data Policy (https://credreg.net/registry/policy#mindata). Panel options that are highlighted in green indicate that data exists for CTDL data elements within that heading. Additional changes to existing data published to the Registry can be changed via expanding the green panels above. New information to describe this credential can also be added by expanding any of the panels to display the CTDL terms and typing in the corresponding information. Please refer to the CTDL Handbook (https://credreg.net/ctdl/handbook) for additional information on CTDL terms.
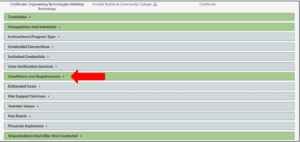
To connect a competency framework to this Credential, open the “Conditions and Requirements” ta
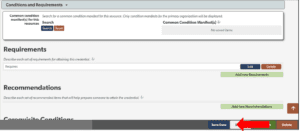
- Once the tab has expanded select the green “Add new Requirements” button located under ‘Requirements’.
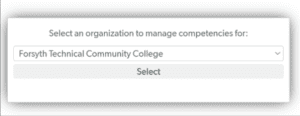
- Once the new Requirement Profile has opened, scroll to the bottom of the profile to find the Competency Search. Select your organization from the list. And click “Select”
- Select the Competency Framework or Competency Collection that has been published to the Credential Registry which you would like to connect to this credential. Please note that this view will show all published frameworks (not just those from your organization). Use double quotes around a keyword to filter on more direct matches. Search for the target framework and select it. In the right Information menu, click the “open framework” button.
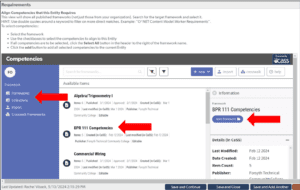
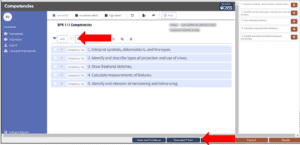
- Selecting your framework will direct you back to the Competency Editor. From there, select all competencies by clicking on the square box located below the framework name and to the left of the “add” button.
Once the competencies have been selected, click the “add” button. After selecting the ‘add’ button, you will see your competencies listed on the right-hand side of the screen. If that is all the competencies that you want to associate with this credential, then click the “Save and Close” button. - You will be redirected back to the “Conditions and Requirements” tab for the credential. If there are no additional changes you wish to make to this credential, click the “Save Data” button.
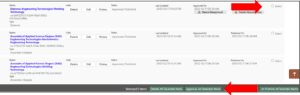
- The final step is to approve your updated credential to be published. From your organization summary page, find the credential that needs to be reapproved and click the “Select” button to the far right. Once the credentials have been selected, click on the green ‘Approve All Selected Items’ button located at the bottom of the screen.