The following instructions pertain to changing existing published credentials using the manual editor for publishing to the Registry.
For further instructions or questions, please contact the Publishing team at publishing@credentialengine.org.
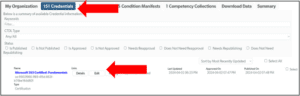
- Log into the Publisher (https://apps.credentialengine.org/publisher) and navigate to the Organization Summary page

- Select the tab for the resource (for instance, Credentials) that need to be updated. Next to each credential name there is an Edit button. If a credential needs to be updated, click on the Edit button.
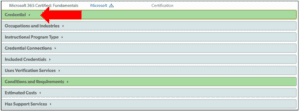
- In the Edit screen for a credential, there are various panel options that expand to allow for changes to existing CTDL terms, as well as additional CTDL data elements that could be added. Expand the Credential dropdown to see a selection of CTDL terms that can be added or updated, including all the data elements required by Credential Engine’s Minimum Data Policy (https://credreg.net/registry/policy#mindata). Panel options that are highlighted in green indicate that data exists for CTDL data elements within that heading. Additional changes to existing data published to the Registry can be changed via expanding the green panels above. New information to describe this credential can also be added by expanding any of the panels to display the CTDL terms and typing in the corresponding information. Please refer to the CTDL Handbook (https://credreg.net/ctdl/handbook) for additional information on CTDL terms.
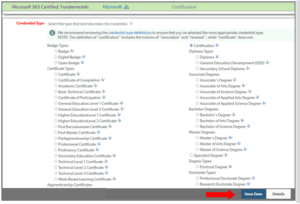
- Once the panel is expanded, scroll to find the CTDL properties that need to be updated. For instance, if Credential Type needs to be updated, review the options available and select the one that best describes the credential.Next to each selection option is an info bubble that brings up a short description of the credential type.
- Once you’ve made updates to the credential, select the Save button at the bottom of the screen
- Open the panels that have existing data to update that information and open panels that don’t have data to add additional information. As updates are made within any of the panels, be sure to save your data.
- If additional credentials need to be updated, return to the list of published credentials and select another one to update, following the steps outlined above.
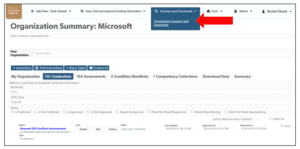
- The final step is to approve your data to be published. From the navigation bar at the top of the page, click on the dropdown menu labeled ‘Summary and Downloads.’ From there, select ‘Organization Summary and Downloads’ to be directed to your Organization Summary Page.
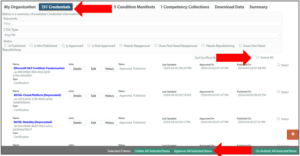
- On your Organization Summary Page, select the ‘Credentials’ tab. The ‘Credentials’ tab will display all of your uploaded credentials. To easily approve your credential data, select the ‘Select All’ button located on the right-hand side of the screen. This will select all your credential data to be approved at one time. Once the credentials have been selected, click on the green ‘Approve All Selected Items’ button located at the bottom of the screen.
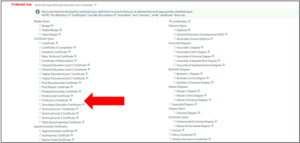 Next to each selection option is an info bubble that brings up a short description of the credential type.